Tiny Bugs In My Pots

Image

I have these tiny bugs (the “grown” versions are 1 mm max. in length) in my pots. Thanks to my macro objective for my smart phone, you get to see them really well.

They’re quite transparent when they’re young, and get more white when older. I’d prefer not to have them, though.

Recycling Coffee Dregs

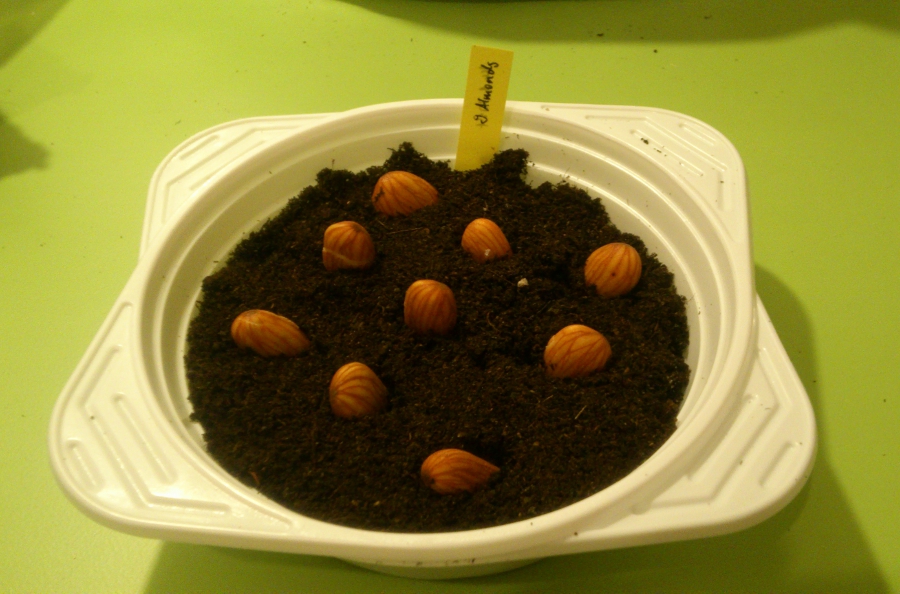
As I wrote yesterday, I used coffee dregs in a mixture with soil for my pine seeds. I’ve read a bit about recycling coffee dregs and coffee grounds and there are an amazing number of things you can do with that “aromatic waste”.

Using Coffee Grounds and Coffee Dregs As A Fertilizer

First of all, you can use it as a fertilizer. Apparently, it will mainly effect the leaves and help them grow. Unfortunately, I cannot find the source any longer.

You can also use coffee as an organic pest control. Even in Parks and Recreations, they featured coffee as a slug-repellent! I read that it also works for (or rather against) moles … and cats. But who would want to repel cats?! I had some tiny insects in some of my pots which had come with the soil. I added some ground coffee on top of the soil. They’re not dead yet, but I’m hopeful. And it smelled sooo nice when I watered the plants!

Recycling Coffee Dregs Into Pots

During my research, I came across that company that recycles coffee dregs into plant pots. Just google it, I don’t want to help them with their SEO to much. That sounds like a beautiful idea for bonsai pots! You only need some casts, but I have plenty of LEGO to work with.

coffee + resin and tea + resin
(c) davidneat

I guess, one would make a silicone mold first and pour a mixture of coffee and resin into it, like this guy (picture by him) did.

Then I came across a related matter: Animal coffins made of recycled coffee and other organic material. I guess one could use that material for bio-degradable pots. I found some “recipes” for organic glue, which in combination with coffee grounds and other stuff could be used. I’ve used up all my coffee dregs already, so I cannot try today. But there is plenty of supply at the office!

Using Coffee for Dyeing

Then, you can use coffee for dyeing fibers and other things like eggs for Easter. Somewhere I read that someone used it as a henna substitute for making tattoos. I won’t go into more detail, because this is not my area of expertise – not that the above areas were….

You can also use it as a peeling for cleaning your skin. And for odor control…

Germinating Stone Pine: Next Attempt

I ordered 10 stone pine seeds on Ebay about two weeks ago, because my last attempt to get them to germinate was a complete failure.

Stratification, Soaking and Sowing

stone pine seeds

Stone Pine Seeds

It said on the label to put them in the fridge for 10 days. As I was away over the weekend, I let them in the fridge for 12 days. Then it said to put them in lukewarm water for 1 to 2 days. So I put them in a jar with water and put that on the heating. Today, the two days were over and I sowed them into three pots. I used a mixture of coffee dregs and soil, because mostly because it said on the label to use nutrient-rich soil.

I used plastic pots again this time, because I realized that the bio-degradable pots suck the water from the soil and I have to water those pots more often.

I read somewhere that they might only take 10 days to germinate. Wouldn’t that be great? Fingers crossed.

Close-Ups of Leaves

Image

Last week, I got the macro lense I had ordered primarily for my RaspberryPi Camera Module, but it is actually a lense to use with your smart phone. I will have to create some kind of an adapter to use it with the RPi.

So, today I took some amazing (at least I think so) pictures of some of my seedlings:

Heating Broken

Aside

Oh no, my heating is broken and it’s the first day of snow outside. It has already cooled down to 17.5°C inside. I can wrap up in blankets and get a hot water bottle, but what about my seeds and seedlings?

New Seeds: Blood Orange

Some days ago, I discovered blood oranges at the supermarket and wanted to make my favourite Sicilian Blood Oranges Salad. I got the recipe from my Sicilian co-worker. They only had a net of them, although I only needed about four, so I took six to work and made juice. Of course they had to have pips and I was tempted and couldn’t resist. So into my mouth they went while I squeezed all the yummy juice from them. It took me a while to squeeze them all, but when I was finished, I put the seeds into a glass of water. Don’t try to answer to anyone with a mouth full of orange pips! It’s really difficult. Back at home after work, I sowed those 12 blood orange pips into the previously mentioned egg carton nursery pots, where I had 4 patches left over after sowing the ginkgo seeds. However, I will just take down their germination period, keep one of them and dump the rest, because I really don’t have the space anymore.

By accident, I deleted the pictures I took of that, so pictures of the salad will have to suffice.

sicilian blood orange salad

Sicilian Blood Orange Salad

Sicilian Blood Oranges Salad

It is a very nice winter salad with loads of vitamins.

You need: blood oranges, chicory, olives, onions, olive oil, pepper, salt and actually parsley, which I tend to forget to buy. Molto delicioso! I often prepare it with normal oranges or grapefruits, but those little pieces of sunset just make it look so much better. Also, after I had pealed the oranges, my kitchen looked like a tiny pig had been slaughtered in there.

New Seeds: Ginkgo – Ginkgo biloba

Ginkgo Seeds

Last weekend, I wanted to order some pine seeds from Ebay, because my last attempt to get them to germinate failed epically. To make the shipping costs more worthwhile, I checked out this guy’s shop and found Ginkgo seeds. I didn’t have Ginkgo biloba on my wishlist, but this is such a cool tree and I think the oldest species around. So why not? I was curious what the seeds would look like, but didn’t really have a mental image or something. This living fossil was declared Tree of the Millenium in Germany, but I couldn’t find which millenium. Too bad.

I had ordered 10, but there were 11 in the bag, probably because one of the shells was already broken so much that the seed almost fell out.

Ginkgo Seeds

Ginkgo Seeds

Sowing Ginkgo Seeds

It said on the instruction that came with the seeds to put them in the fridge for 4 weeks at 4-5°C (39-41°F). I think I measured once that my fridge has 8°C. Anyway, I cracked the quite soft and thin shells a bit with the back-end of a knife and put half of them into a wet paper towel and into a plastic box with a lid and into the fridge. (I will read my fridge manual tomorrow, if I can find it.) The other half I put into warm water and will let it soak for 24 hours. That was also suggested in the instruction, but for after the 4 week period of stratification.

That was the day before yesterday. Today I put the six seeds having been soaked overnight into soil. Yesterday, I put them into the egg carton nursery pots I had come up with yesterday. The minute I had put them in, I remembered that I had just 5 minutes earlier thought it a stupid idea to put them into a bio-degradable pot because of their long germination period. Well, too late. I will be more considerate with the ones in stratification. The instruction doesn’t say anything about the germination period and temperature, but I read in another blog that the ideal temperature is 21-24°C (70-75°F). It suggested sand, so I will hopefully remember to use a mixture of sand and potting compost. (I forgot about that yesterday…)

Recycling: Nursery Pots from Egg Carton

Recycling Idea for Egg Cartons

When I singled my lemon seedlings into the bio-degradable pots yesterday, I struck me that the material was not unlikely to the material of egg cartons. So when my co-workers cooked Eggs in Mustard Sauce today, I asked them to keep the egg cartons for me. Back at home, I used one of them and turned it into a nursery pot battery.

Egg Carton Turned Nursery Pots

Egg Carton Turned into Nursery Pots

You don’t need to cut the spikes, I just felt they were superfluous. I will write later what I used them for.

New Seeds: Almond (Prunus dulcis)

Where to Get Almond Seeds

I don’t remember how it came to me, probably while eating almonds, but I had the idea to try and grow almond trees from seeds. I thought about where to get almond seeds. The obvious idea was to get it from the baking department of the supermarket. But then, who knows how long they would’ve been in the shelf. On the other hand, I thought, the weeks right after Christmas would be the ideal time, because many almonds are sold during Christmas time and the supermarket probably just restocked. So I bought a bag of organic almond seeds (with skin). But I remembered that sometimes they are sold with their shell still around. So I went to an organic supermarket and got five of these.

How to get almonds to germinate

Then, I thought that the shells seemed really hard and that I should try and crack them at least a tiny bit. That’s why I bought a nut cracker last week! However, it (or I) wasn’t strong enough to crack them with the nut cracker, so I took my good old mortar and pestle and hit them hard. Too hard, because I didn’t manage just to crack the shell a bit – all of them where shattered. I even crushed some almonds. But those fed me well. I had 5 shells with 7 almonds, but could only use 3 further.

soaked almonds

Soaked Almonds

I watched some videos of people who had more or less successfully gotten almonds to germinate and tried to follow the instructions of the more successful attempts. I soaked the almonds in water for four days and then put them into potting compost with the pointed end down.

I put the ones from the shells into bio-degradable pots and the “baking almonds” into a plastic bowl. I had cut some holes in the bottom and put the perforated bowl into another bowl, so the water could drain. Don’t let the photographs fool you – I added a layer of soil onto those pots.

Now waiting time begins. Some people wrote about three months of germination period for almonds. I hope that’s not true! We’ll see and I will keep you updated.

Almonds as Part of the Prunus Genus

When I did some research on Wikipedia on Almonds, I found out that they belong to the Prunus genus- as do peaches, apricots, cherries, plums, cherry laurel, and blackthorn. It’s a vast genus! And so many of them are delicious.

More Singling Seedlings

I just realized today that I used the wrong word when I wrote about singling out the lemon seedlings during the weekend. I wrote re-potting which wasn’t quite correct. Sorry, my gardening English is developing the same speed my plants are. I hope I got it right now. Anyway, they actually moved to new pots…

bio-degradable pots

Bio-degradable pots

Singling Out Seedlings

lemon seedling

Lemon Seedling with roots

So, I got my bio-degradable pots today – 2o of them – and new soil. So I singled more lemon seedlings. I came across this nice example with some side roots, which I want to share. The others mainly had the one vertical root – I’m sure there is a special name for that too – and only rarely one more horizontal root. This one, however, had four or five horizontal roots. Good boy! (Or girl, or both…)

Bio-degradable Pots

I like those bio-degradable pots. For one, they’re not made from plastic and their colour is kind of earthy and warm. The black plastic pots might have the advantage of turning the sunlight into warmth better and even storing that warmth a bit. The greatest advantage of the bio-degradable pots might as well be their greatest disadvantage: They’re bio-degradable! Who would have thought?! No, seriously, you don’t need to remove them for re-potting, they will degrade in the next pot. I’m just afraid that they will start degrading before their time because of the watering…For me, another advantage though is their size. Because they’re slightly smaller than the plastic pots, I can get more of them into the platter (is that the right word? the green bottom of my mini greenhouses).

Anyway, I will keep the plastic pots, in case I want to give the seedlings away next summer. I have way too many.